Saturday, February 18, 2012

3-tier cake stand


It looks pretty.. it looks cute.. it looks feminine... when I saw it for sale at singapore motherhood forum, I thought 'I am just gonna buy it', even though I have never baked 3 different types of baked stuff at one go, let alone hold any tea party before.


It is a 3-tier Ashdene fine bone china cake stand in lovely pink colour, adorned with cherry blossoms...


Maybe I shall try inviting some friends over for tea in near future because of it :).

Tuesday, January 31, 2012

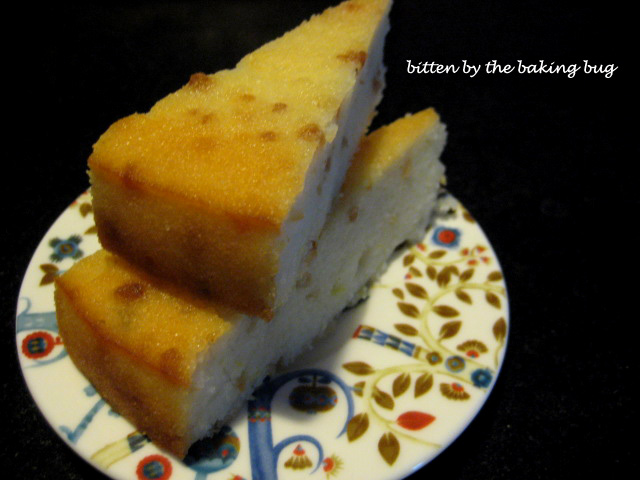
citrusy yogurt semolina cake

Chinese New Year came and is almost over soon, but I hardly had the time to fully soak in the atmosphere. It was so hectic..... I was busy preparing to get back to my hometown and hubby's hometown with baby for the 1st time, worrying about him adapting to all strangers (relatives actually) and preparing him for infant care starting tomorrow, as well as worrying about him adapting to more strangers (teachers at the centre).

With all that going on and more (my iPhone 3 almost blacked out on me), I was actually surprised that I managed to bake 2 cakes within the time frame of 2 weeks, despite the fact that they are both yogurt semolina cakes.

A pack of semolina flour had been sitting inside my cabinet since after Chinese New Year last year, when hubby suddenly felt like making sugee cake. But he didn't get to make any at all. And this year, I suddenly felt like making semolina cake before Chinese New Year, and using that pack of flour, I made not only 1 but 2 cakes :) .

I experimented with fresh orange for the 1st trial and fresh lemon & almond for the 2nd. My personal preference is orange flavour as it is less tangy and has a more robust taste. I also find that the almond bits (I used 1/4 cup) do not add much flavour to the cake, in fact they kind of dilute the clean fresh fruity taste. I think this recipe is so versatile that it will turn out great regardless of what type citrusy fruit you choose to use.

Citrusy Yogurt Semolina Cake

1 & 1/2 cup semolina flour
2 cup plain yogurt (low fat if you like)
1/4 cup canola oil
1/2 sugar (increase to 1 cup if you have really sweet tooth)
1 tsp baking soda
1 tsp vanilla essence
1 tbsp lemon zest (or zest of whatever citrusy fruit you like)
a pinch of salt

for the syrup
1/4 cup water
1/4 fresh lemon juice (or juice of whatever citrusy fruit you like)
1/2 cup sugar

1. Beat yogurt and sugar until the sugar dissolves
2. Add oil, zest, baking soda and salt.
3. Once the wet ingredients are mixed well, add the semolina flour.
4. Mix and let stand for at least 2 hours (according to achefsmelody, this enables the semolina to soften and the cake to turn out fluffy)
5. Pour the batter into a greased tray and bake in oven preheated at 175 degree C for 25-30 mins or until toothpick inserted comes out clean. Let cool for 15 mins.
6. In the mean time, prepare the syrup, heat the water and sugar until the sugar dissolve.
7. Turn off heat and pour in lemon juice.
8. Pour the warm syrup on the warm cake evenly.
9. Let the cake rest for half an hour to fully soak up the syrup.

Recipe adapted from achefsmelody.

This is how the cake looks like fresh out of oven.

This is with all the syrup poured on. Don't worry about it not being absorbed immediately.

This is how moist the cake looks like after all the goodness of the syrup has gone into the cake.

The cake is really moist and very flavourful. It is best eaten on the day it is made, served warm just after the syrup has been absorbed fully by the cake. If you have leftover to keep for the next day, remember to wrap it with cling film to preserve the moisture. I didn't do that for the lemon cake and the top become slightly dry the next day.

Monday, January 9, 2012

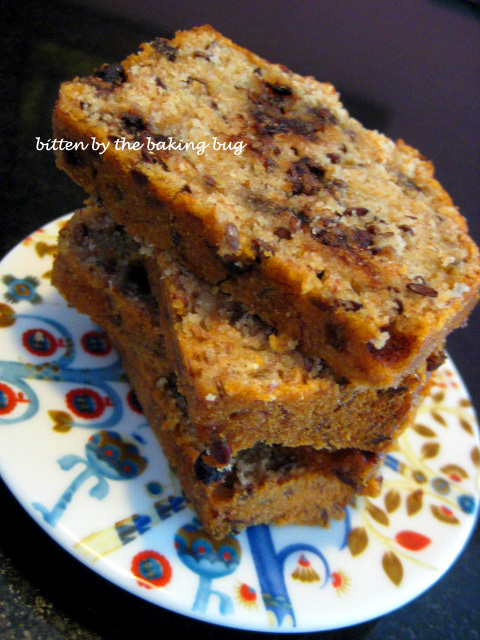
low fat banana chocolate chip quick bread


I simply just looove this recipe.. it is so easy to put together, smells so aromatic while baking, tastes so yummilicious and best of all, absolutely healthy for a sweet treat... all the qualities I look for for a home-baked recipe :)


Low Fat Banana Chocolate Chip Quick Bread

1 large very ripe banana (mashed)
85 ml honey (I used clover honey)
3 tbsp olive oil
1 cup plain flour
1/2 cup wholemeal flour
1 tsp baking soda
1/4 tsp salt
1/2 tsp cinnamon powder
1/4 cup flaxseed (optional)
1/4 cup chocolate chips (optional)

1. Preheat oven at 180 degree C.
2. In a bowl, whisk together banana, honey and olive oil.
3. In another bowl, sift all dry ingredients.
4. Gently whisk in the flour mixture into the banana mix, until just combined.
5. Pour into a greased loaf tin and bake for approx 30 mins or until toothpick inserted comes out clean.
6. Cool in the baking tin for 10 mins, then turn out onto wire rack to cool completely.

This recipe is adapted from the food coach.


This quick bread is really moist and soft, without being too dense (like those commercial banana bread or cake) and the flaxseeds add a nice contrasting crunch to it. It is definitely a good option for breakfast over a cup of nice coffee.. or to have with tea in the afternoon. Add a scope of vanilla ice cream, and you have a fabulous dessert ready instantly. Now, that's versatile for me :)

Sunday, January 1, 2012

Colours of Spring

With Xmas just passed and the calendar just flipped to 2012, another festive occasion is already waiting around the corner ... It's less than a month to Chinese New Year !!

I am all excited about this Chinese New Year. It will be the first time we are introducing our little one to families in Penang & Alor Setar :). At the same time, it is quite nerve wracking too, considering that we are really not sure how he will respond to those new environments for 10 days!!

Part of CNY is about the preparation: spring cleaning, cookies making, food buying.. and of course, house decoration too!

This year.. I stir away from the traditional RED and made some colourful pastel origami cherry blossom flowers. I know, cherry blossom is not exactly Chinese but .. hey.. who says these aren't plum blossom? Further more, they make such wonderful addition to the window/wall and they exude such happy vides. Isn't CNY about celebrating cheerfulness and looking forward to the brand new year??

These are the individual petals, stacked and waiting to be glued together. The steps to make these can be found here.

These are the completed flowers, waiting to be put up.

This is how the finished window/wall looks like. Some of the items look familiar? Yes, the balls and the glittery loops are recycled from Xmas deco :).


Tuesday, December 27, 2011

low fat double chocolate cookies

As part of my continual search for healthier bakes, I made some low fat double chocolate cookies with olive oil a few weeks ago. Only now that I found some time to load them up.


These cookies are soft, almost cake-like, with a very slight crunch on the edges. They may not be your cup of tea if you prefer chewy or hard cookies. But I find them quite pleasing to my palate, though I kinda expected them to be harder. They are definitely tasty.. and a great choice to satisfy the my choco craving without feeling too guilty... *grin*...


Low Fat Double Chocolate Cookies

1/4 cup olive oil
1/2 cup sugar
1 egg
1 tsp vanilla essence
1 cup all-purpose flour
1/2 tsp baking soda
1/4 tsp salt
1/4 cocoa powder
1/2 cup chocolate chips

1. In a large bowl, beat olive oil and sugar until well done. Add egg and vanilla and mix until well blended.
2. In another bowl, combine flour, baking soda, salt and cocoa powder. Gradually add dry ingredients to the wet mixture.
3. Stir in the chocolate chips.
4. Drop cookie dough by spoon onto baking tray lined with parchment paper, spacing them with enough distance for spreading.
5. Bake in preheated oven at 190 degree C for 8-10 mins. Let cool on the sheet for 1 min, then transfer to wire rack to cool completely.

This recipe is adapted from lowfatcooking.about.com.


Sunday, December 18, 2011

DIY Xmas home deco

I have not been doing much baking lately, mainly bcoz baby's sleeping time has been quite erratic, and I can't be sure I have enough time on hand to finish one round of baking while he sleeps. So, I tried doing something that can be put away immediately once my dear baby starts to stir.. I did some DIY deco for Xmas.. :)

All I needed was some white papers, some origami papers, scissors and glue, and I was good to start. Btw, Daiso sells some interesting origami papers. I bought all of mine from there.

Xmas tree is a must for this festive season and I think these trees are adorable. They are relatively easy to make and you can add as many layers of tree canopy as you want depending how big and tall you would like the tree to be. I made mine with only 3 layers since I was limited by the origami paper size and they are absolutely prefect for table or counter top. You can use scrapbooking paper or even wrapping paper for bigger tree. I learned the steps from this video.

Xmas won't be complete without some glitters and shines, right? I used some really sparkly papers to make these origami balls and joined them together to make 2 glitter loops. Some of the sparkly papers went into making a 5-pointed star. I learned the steps to make the balls from here and the 5-pointed star here.


To top things off, what else but some beautiful snowflakes to make our tropical Xmas an extra special one. These snowflakes are really fun to make and the possibilities are endless - depending on how you cut/create them, each one is unique. I learned the steps from here.

This is how the final put-together of the origami window/wall looks like.


Last but not least, I would like to take this opportunity to wish everyone a MERRY MERRY XMAS and a very HAPPY HAPPY NEW YEAR ...

*****************************************************************************

Btw, for anyone who is interested in origami and paper art, paperkawaii has some really kawaii works, free interesting info and tutorials.

Tuesday, December 13, 2011

cauliflower popcorn

Well, these treats are not bake goods but they tasted so good and at the same time so healthy compared to other snacks, that I think I must post it here to share.

I saw this recipe on Cold Storage's bi-monthly magazine couple of weeks ago. Yes, Cold Storage has their own magazine called Savour the Good Life. The recipe seems interesting and relatively easy to make, so I made a mental note to try it when the opportunity arises.

Last week, I happened to have some leftover fried rice from dinner which I intended to reheat for lunch the next day. I was searching for extra stuffs to make the fried rice more appetising when I saw that we have half a head of cauliflower left in the fridge. To put all of the cauliflower into the fried rice would be too much. So I chopped up the cauliflower, core and stem went into the fried rice and the rest went into making these interesting popcorn.


Cauliflower Popcorn

1 head cauliflower
1/4 cup olive oil
1 tsp salt

1. Preheat oven to 220 degree C
2. Cut out and discard cauliflower core and thick stem. Trim the rest into florets the size of golf balls.
3. In a bowl, add cauliflower, olive oil and salt. Toss thoroughly.
4. Spread cauliflower on baking sheet. Roast until florets become golden brown. Turn 3-4 times during roasting.
5. Serve immediately.

Few tips from my experience:
1. The original recipe calls for 1 tbsp of salt but I think they were on the salty side so I change it to 1 tsp here, but if you like salty popcorn, go ahead and add more salt.
2. DO watch out for the roasting. The original recipe states roast for an hour but mine was done at 30 mins and as you can see from the picture, certain parts were already slightly charred.
3. Make sure the florets are of similar sizes, some of my smaller florets were completely charred.
4. Lastly, if you have only half a head of cauliflower (like me), adjust the olive oil and salt accordingly :)

Writing this makes me salivate, I think I will be buying more cauliflowers soon. The article in the magazine says the cauliflower popcorn is addictive, I definitely agree.

Related Posts Plugin for WordPress, Blogger...